Bookbinding, and Cheltenham open studios

Only a mere 3 years since I have last added something to this site(!) Woops. But I have good reason, I have had a baby and now a toddler , who is keeping me busy.

Time is precious, precious time spent with him is not wasted , but it means time for making things and being creative for personal things is in short supply. My focus has shifted away slightly from printmaking more towards bookbinding/ bookmaking as these are easier to pick and put down quickly.

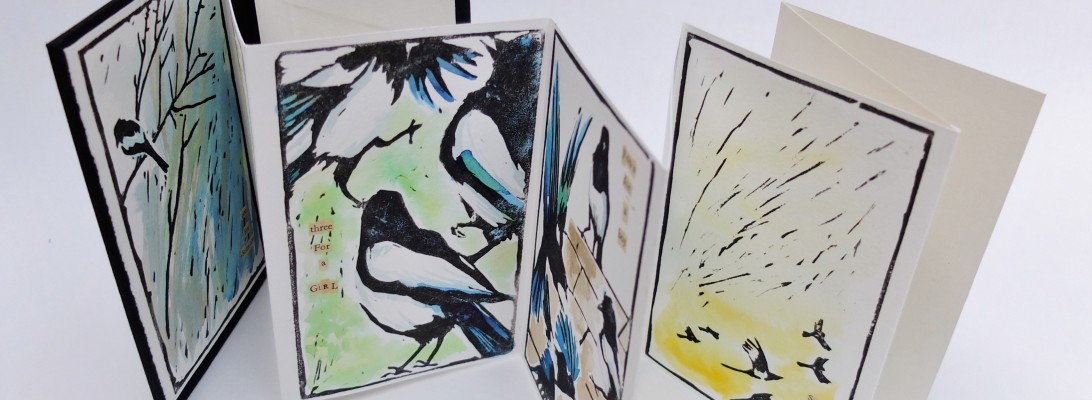
So there is not many new prints to show you but lots of books!

These are some pics of my ready made mini concertinas. which are a palm sized 8 x 6 cm .

These are fun to do as they each are unique as I use paper marbling scraps or misprints or just decorative paper I find in my drawers.

Range of book sizes that I make in my blank concertinas

The big thing I am doing this year in terms of my personal work is taking part in Cheltenham Open studios.

https://cheltenhamopenstudios.org.uk/

Since a few weeks before having my baby we built a log cabin studio in the garden, which is my workspace.

Adana 5 x 8 and some notebook covers I have printed.

This is what I will be opening up to the public to come and have a look around, perhaps pick up some bargains direct from me and have a look at what I do. I also hope to have some equipment set up so visitors could have a go at printing as well!

Any way just wanted to update any passers by to this website about what’s going on around here.

Thanks

New process video about making drypoints.

I made a couple of drypoints this year of lockdowns as you need very little to do them , main thing is a press, and I am lucky to have a little table top one at home.

As with all printmaking processes the small details of how you do them differ between people and their preferred ways of working, so this is how I tend to do it 🙂

The one of many project on instagram is a great thing, and must have raised quite a bit of money for charity by now.

As always thank you for visiting and reading and watching! Have a lovely day 🙂

Non toxic Printmaking- Cleaning up oil based inks with vegetable oil.

I have for a while now been trying to do most of my cleaning of oil based inks with vegetable oil. The interest in safe wash inks, so called eco friendly and non toxic, is because they are easier to clean up . You can just use soap and water even though they are oil based. Great! But this special ability, being water soluble means it reduces its range of uses as a printmaking ink in my opinion. I have bought a few tubes myself , and have used them for monoprinting, or Kitchen Litho, forgetting about the water soluble nature, and then stuff starts bleeding and not working … and THEN I remember about the safe wash inks, Doh!

Looking into non toxic ways of printmaking , I came across the technique of using veg oil to clean up. Gave it a try and have been using it ever since.

Here is my video on Youtube where I give a really quick demo of this. ( really quick as my camera battery was about to die!)

By removing white spirit from cleaning up oil based inks, you remove the biggest reason that it is deemed toxic for the printmaker. And arguably the thing that would make it the most un-environmentally friendly. The traditional oil based inks I use, the base is linseed oil, a plant based oil , so less fossil fuel usage.

Safe wash my not be all its cracked up to be is all I’m saying. What do you think?

Siskin Linoprint, hopefully one of many.

I have started a new ongoing project to print my favourite birds from the UK ( possibly elsewhere) in detailed linocuts.

4 layers of lino to build the colours.

I wanted to challenge myself with this project, so it is technically challenging as I am also printing them as multi block prints. Which means tight registration from separate blocks of lino carved to make the other layers of colour. In this case, yellow, green and the background for example. Something which I have not done before to such a high level of accuracy, and it took a long time to get right on this first print!

As I said though it is a learning experience for me as well as the chance to make some hopefully beautiful prints. They are for sale on my Etsy site, PrintPaintDrawMake and I will be donating a portion of the price of the sale of these to my local wildlife animal charity.

I have started my next lino cut in this series and was thinking that due to lock down I would get loads done, but actually I have not made much progress on it. I have noticed that my work is in fits and starts, sometimes due to time commitments elsewhere, as I have been working from home during this time. But projects like this can’t be pushed, I find I need to be in the right frame of mind, otherwise risk ruining it.

Thanks for reading, stay safe.

Dunnock to be my next subject.

Recycled printmaking.


Something which is very important in my work is the amount of recycled materials I can possibly use in the process. I like the idea of making something beautiful from essentially rubbish. Thats why I love collagraph making as I tend to use old cardboard packets. another bonus of this is the fact that its a very cheap material, so the pressure of potentially messing up materials you have bought just for the task are not there.


fish starbucks cup fish

fish 2 starbucks cup fish

DSCF5957.JPG

These fish were made from a used coffee cup. the plastic coated card great for wiping ink off of.

Anybody else that have found recycled materials that are great for printmaking? or anything crafty really ?

thanks for reading.

New Video About Magpie Rhyme Book

soooo this summer holiday I have tried to finish off a few projects that have been lingering.

One of them is my book called A Magpie Rhyme , it is an artist book (which is just a hand made book by an artist) . I finally made the last few in the edition ( only 10 in it ) and I wanted to make a video about the process.

I have done both of those things so yay to me 😀 , the video is up on you tube now.

I missed out the actual printing of the linos, but I think people can understand what that might look like. Putting the video together and I forgot how many parts of the process there are!

Any way would love you to have a watch and let me know what you think,

cheers 🙂

link :


DSCF5615DSCF5619

Viscosity printing on laser etched woodblock ?

Here I found a lasercut piece of mdf that was hanging around the workshop, and I thought I could use it to try a multi colour print.

It was engraved by the laser so I could of just inked it with a roller and printed, or printed it like an intaglio print. As there were different levels to the engraving I thought I would blend the techniques.

And at the time I thought I was doing viscosity printing but doing more research after, I did it slightly differently to the general way you apply ink in viscosity printing.

Viscosity printmaking is a way of applying different coloured ink onto the same plate, utilising the way ink will react to each other if they have different viscosity (thickness or oilyness)

Here is the plate after I had scraped yellow ink into it, as you would an etching or collograph plate. Yellow ink or at least the etching ink here is naturally runnier than other pigments, I don’t think I altered it with anything, thinking as it was going to be the lowest inked bits it wouldn’t matter ( not quite right!)

Then I wiped it with scrim…

Then I mixed an orange ,

I applied this layer of colour with a soft neoprene roller, the idea being the soft roller deposits the ink on some of the lower areas. When I rolled it over though, the orange covered most of the yellow I could see! Anyway I carried on with my next colour.

Contrasting pale blue I thought would pop out, and the idea behind viscosity printing is the layering of colours without them blending, so this colour would be a good test of that thought I.

Here is the plate before I rolled the blue on, which I made a stiff ink , by adding some chalk to, or magnesium carbonate works as well.

When I rolled the blue on with a firm roller, it did not stick very easily , because I had got the order muddled up. A stiff ink wont stick to an oily ink , but oily will stick to stiff.

Either way , into the relief press it went. I used damp paper and some felt blanket for a soft packing so the paper would be pressed into the blocks low places.

Here is one of the prints I took. I like the way the ink had blended on the highest points, but that wasn’t what I was going for. But cutting myself some slack, the ply wood had a textured surface so it wouldn’t have been a solid colour whatever I did perhaps .

It was an interesting block to ink up, and I learnt a lot about layering ink by doing it wrong and I’ve almost remembered the mantra stiff wont stick to oily… I think..

Thanks for reading, happy printmaking.